Tuesday, January 31, 2012

Eight Petal Flower Bead Ring Tutorial


When I was in junior high, I went to the mall and saw a beaded flower bracelet that I fell in love with.  It was about ten dollars, so it was out of my budget.  I remember going to check it out everyday because I thought it was so cool, but knowing that I didn't have the money to buy it.  I would carefully examine the bracelet, trying to figure out how it was made, then run home and try to replicate it.  One day I finally prevailed and was able to figure it out.  I was so excited about the bracelet I wore it to school the very next day.  A girl in my gym class liked it so much she offered me five dollars for it.  Being short on money at the time, and calculating it out, the bag of beads was only 50 cents, and the thread was free (from my mom) so this seemed like a good deal.  I gave her the bracelet and she said she would bring me five dollars the next day.  The next day came and went and she never paid me.  After a week I asked her about the money and she said "what bracelet?" like the transaction never took place.  I was devastated, confused, and angry.  But I did nothing.  I never told anyone this story because I was so embarrassed at how naive I was.

Every time I see any beaded piece of jewelry I think of this story.  It makes me sad and happy at the same time.  It makes me sad to think that there are mean spirited people out there and that I was so passive I never stood up for myself.  It makes me happy because I know I've come a long way from then and I am no longer the passive scared little girl. 

I hope you enjoy this tutorial on how to make this eight petal flower bead ring (which could be also made into a bracelet).  Maybe you can make it for someone you love to give them a little happiness.

Video tutorial is at the bottom of the post or here is the direct youtube link.


Sunday, January 29, 2012

Valentine's Day Hanging Decoration Kid's Craft


This is a simple kid's Valentine's Day craft.  Avery enjoyed taking it outside and watching the tissue paper blow in the wind.    The materials required are
1 10 inch piece of yarn
2 sheets of tissue paper (about 2ft x 2ft)
1 piece of cardboard cut into a 3.5 inch circle

Take both pieces of tissue paper and line them up on top of each other.  Fold the tissue paper in half, and then half again, and then on the diagonal in half (like you are folding a paper snowflake).   Trim around the edge to create a circle (doesn't have to be perfect.  Cut out shapes onto the tissue paper, since it's Valentine's day we cut out hearts.  Cut a small hole on the tip/center of the tissue paper.  Knot one end of the yarn and string the yarn through the center of the cardboard and through the tissue paper.

Cut a square from each piece of tissue paper

Fold in half and in half again width wise.

Fold in half on the diagonal,a nd then again.  Trim the edges to make a more circular shape and cut out heart shapes.


String yarn through a round piece of cardboard and then through the middle of the tissue paper.

Save cut out heart shapes for a future craft project, or use as table confetti.


Thursday, January 26, 2012

Origami Star Happy Birthday Bunting

I think my mom loves my blog. She's never actually seen it, but I think she loves it because all of my old belongings (what she would call junk) that have been stored in her garage is slowly being transported to my house. This "junk", crafts that I made in high school and college, has found new life with my blog. She recently handed me a box filled with stars that I folded in high school. When I opened the box, I said aloud "Wow, I really had a lot of time on my hands!" My mom smiled, and said "Yes, you did" (probably implying that I had no life back then.)  I snatched up the box and stowed it in my car (along with a couple of other boxes filled with "goodies"), because I knew exactly what I wanted to do with them.

Avery's birthday was earlier this month and the stars would make the perfect birthday bunting. Using a sharpie I wrote the letters happy birthday on the stars and strung them together with needle and thread. To mount it on the cake I used bamboo skewers. Easiest and cutest project ever. Everyone that came over to celebrate her birthday asked where I purchased the bunting. I could probably make fifty more signs, with all the stars that I have.

Here is a video tutorial on how to fold paper stars.  I used "star paper" to fold these stars, which makes it easier to fold.  Star paper is just paper that is already cut into strips.  You could cut the paper yourself, or buy quilling paper from Amazon. Here is the link to quilling paper: Craft Quilling Paper 100-Pack, 25 Colors  


Monday, January 23, 2012

How to Fold an Origami Heart Envelope

This origami tutorial reminds me of the notes I use to write in school.  Do you remember writing notes with loose leaf and folding them into shapes?  We would pass them secretly, as they contained important secrets, such as the latest crush or who kissed who.  I don't think kids in school pass notes anymore, they probably just text.  Folding notes will probably become a lost art.


Video tutorial:


Sunday, January 22, 2012

Whats Inside your Child's Bath Toys? (Warning: Gross Image)

I was always been a little suspect of Avery's squeeze bath toys (the ones where you draw water in and push them to squirt out a stream of water), but I let her play with them because those were the ones she loved.  Last night while giving her a bath I noticed that her green frog squeeze toy had black stuff all around the lips (where the water gets drawn in from).  It looked like mold or mildew.   I am pretty good about cleaning her bath toys, and draining as much of the water out of those squeeze toys as possible, but I guess my efforts were not enough.  I decided to cut open the toy to see what my daughter has been exposing herself to each time she bathed.  After cutting the frog open I was about to vomit.  Every internal surface of the toy was covered in mildew.  Avery takes this toy and squeezes the water on her face sometimes.  I was thoroughly disgusted.  All of her squeeze bath toys went into the trash.

Any other readers experience this?  I'm surprised that these toys are still on the market.  Thinking about it makes me sick.


My Little Pony Fashion Spa Day with Elsa and Ariel too
https://www.youtube.com/watch?v=2os_1UVecwc

Frozen Fever Fashion Show with Elsa, Anna and Ariel
https://www.youtube.com/watch?v=FGioMsDFPJU

Japanese Eraser Collection with My Little Pony Pinkie Pie
https://www.youtube.com/watch?v=TpaNLkecT54

Saturday, January 21, 2012

How to Fold an Origami Heart With Necktie Place Card

When I was a waitress in college, to pass the time away during the off peak hours, the other waitresses and I would fold our tip money into little origami figures.  First it started out being simple, making hearts out of dollar bills, but then we started to get competitive and find new ways to fold these dollar bills (mind you this was before the time when the time internet was popular and you could find howto's).  One of the other waitresses showed me how to fold a cute shirt and tie with a dollar bill.  This origami that I am going to show you reminds me of the dollar shirt and tie, but is much easier.   This heart would be great to put as a place setting for a wedding (if you are patient enough to fold all of them) or a simple dinner party.

If you want the tie to be a different color than the shirt, your paper must be a different color on each side.  To make this book page heart I glued a white sheet of paper onto one side of the newspaper/book page, then cut it into a square.

To make this heart follow the video instructions below or you can go directly to the youtube link.


Wednesday, January 18, 2012

Book Page Corner Heart Origami Bookmark

This is another heart tutorial.  Is the 'book page' trend over yet?  I sure hope not, because I just love the look of this corner bookmark folded from a book page.  The great thing about origami is that it is cheap and anyone can do it - with the proper instructions.  

When I was a kid, my parents bought me an origami book (from Thailand, all in Thai!).  I was so excited to get it until I started to attempt to make the figures.  Have you ever seen the diagrams in an origami book?  There are a lot of arrows, some that swirl around and point back to the same spot.  And my book was in Thai, so when I asked my parents to translate the words for me they would say "its says 'Fold Over'"  You could imagine how frustrating this was for an eight year old.  I'd like to say it was perseverance that helped me figure out most of the instructions, but I think it was just pure boredom that drove me to sit and decode it all.

I still see origami instructions out there that completely confuse me.  This corner heart was from that old origami book my parents gave me.  I actually lost the book, but remember making this.   I hope you enjoy my video tutorial on how to create this cute book mark for someone this Valentine's Day.  There are no confusing squiggly lines to follow just my hands to guide you through it.

I used a book page for this but origami paper would make awesome book marks also.  The nice thing about origami paper is that you don't have to cut it yourself (if you are making lots of these).  I love this origami paper from Amazon.  If you go to the Japanese dollar store they should have lots too (Daiso is the name of the Japanese dollar store in our area).

Monday, January 16, 2012

How to Make a Puffy Origami Heart Garland

This is probably going to be heart week. With Valentine's Day coming up I have so many heart tutorials I want to share. My camera is full of heart crafts! Here is a simple one and one of my favorites. It just requires some paper and yarn. Please view the video tutorial for the full instructions. I used wrapping paper to make these hearts. If your paper is thin then you want to use longer sheets of paper, or it will be difficult for you to "puff" the hearts. The proportions I uses are 1x5 (ie for 1inches by 5 inches, 1 cm by 5 cm, 2 cm by 10 cm etc). If you use thicker paper you can get away with 1x4 or maybe less.
String hearts together with yarn or bakers twine.

The basic step is to fold a triangle from a strip of 2inch x10inch paper.  See video tutorial for full steps.


Sunday, January 15, 2012

Woven Drinking Straw Heart

If you're at your McDonald's and the kid's need some entertaining, try weaving a heart out of some straws. All you need is two straws and scissors. You could also weave this heart from paper strips. Cut the strips to about 1 cm thick and 30 cms long. Follow the video tutorial on how to weave the heart below. This would be perfect to make one our two and stick them on a home made Valentine's Day card. You could also string them together and make heart garland.
First image is two drinking straws, one bent over the other to form a V.  Follow the video tutorial for further steps.


Direct youtube link to video tutorial.

Thursday, January 12, 2012

How to Make Your Own Baker's Twine

I needed bakers twine for the Valentine's Day Card I made, but did not have any on hand. I decided to try to make some baker's twine with some butchers twine I had at home. I want to note that if you need a lot of baker's twine then it probably makes more sense for you to buy it. But if you just need a couple of yards or live somewhere that does not sell baker's twine, then this tutorial is for you.

Use a drill to separate the butchers twine into two strands.  Take one of the strands and dye it with the dye of your choice, I used food coloring which worked ok for a more light pastel color.  Wait for the strand to dry and then knot together with the other strand.  Attach the knotted end to your drill and spin the two strands together.

Use drill to unwind the butchers twine into "sub-strands".   Dye one of the strands with the dye of your choice.  I used food coloring which is on the lighter end once it dries. If you are working with string that is thin, you do not have to unwind the two strands.  Simply dye one strand and wind it together with the another.
Once the dyed strand dries, knot both strands together and attach knotted end to the drill.  Hold opposite end and turn on drill to wind strands together.  If your strands are long you may need to have someone help you hold the other end while you operate the drill.


Wednesday, January 11, 2012

DIY Valentine's Day Card

I love song lyrics.  When I listen to a song I love it more for the lyrics than for the melody.  This Valentine's Day I decided to take one of the lyrics to Katy Perry's song and put it on a  DIY Valentine's Day card for my husband. I also made the card into a "notebook" because the lyrics are talk about adolescence.


Cut out the "notebook" cover from a gift box.

 Line the inside of the notebook with some wrapping paper and cut notebook paper to size.

Sew the notebook paper onto the cover.

Write a little love note.
Sew a couple of buttons on the front and back.  Stamp your favorite lyrics onto the front and tie with bakers twine.

Tuesday, January 10, 2012

Thai Fried Garlic (Gratium Jiew) Recipe and a DIY Mason Jar Spout

When I eat at my parents house, my mother always brings out a small jar of fried garlic.  These little morsels of heaven have a very distinct garlic flavor (more mellow than raw garlic, but more bite than roasted garlic).  They also add a nice crunch to "kao thom" (a thai rice porridge), noodle soup or Hainan chicken.  I asked my mom for the recipe to share with you.

There are two versions of this recipe.  The images below show the dry version where the oil is strained out.  You can use the strained oil as garlic oil for cooking.

Ingredients:
1 head of garlic pealed and minced
1/4 cups oil (canola or vegetable)

Place both garlic and oil into a medium sized saute pan or wok (do not preheat).  Turn on heat to high and stir garlic and oil. Continue stirring for a one to two of minutes or until garlic starts to turn very light tan.  Once garlic is medium color, turn off the heat.  Keep stirring the garlic in the pan.  The residual heat will continue to cook the garlic to a nice golden brown  You do not want to burn the garlic or else it will be bitter.  Once garlic is golden brown remove from pan and put though a fine mesh metal strainer.  Catch the oil in a container and use as garlic oil.  Let garlic sit in strainer for 15 minutes so oil is mostly drained out.  Transfer garlic into jar and place both oil and garlic into refrigerator or you can use immediately.

Fried garlic in a mason jar (with pour spout from salt container).  You could also add some dried peppers into the mix if you like spicy.

Mince garlic and add to oil.  I know it seems like a lot of oil, but you will strain it out to make garlic oil.

Once garlic is medium brown turn off heat and keep stirring.  Do not burn the garlic.

Yum..


To create a pour spout for your mason jar cut out the top of a salt carton.  Cut to size of mason jar top.
Morton Salt top placed on top of mason jar for easy pouring.

I took apart the spout with pliers and glued piece of wrapping paper on top.

Finished product.  Perfect to give as a gift or keep for yourself.

Monday, January 9, 2012

Easy DIY Penguin Hat

I love clearance sales, my husband does not.  Last week, Michaels Arts and Crafts had a huge clearance sale.  I wandered up and down the aisles, looked through the bins for hidden "treasures" (my husband would say "junk").   When my husband sees clearance items, he sees it for what it is.  When I see clearance items, I see it for what it could be.  Under the mass of plastic ornaments and wind up stocking stuffers, I found a kids penguin eye mask and mittens for only forty cents.  I picked up a couple and put it into my already overflowing basket.  My husband looked at me like I was crazy.  He asked "what is a two year old going to do with an eye mask, isn't that a strangulation hazard?  Isn't she afraid of the dark?"   "The eye mask would make the cutest hat, all you need is to see its hidden potential" I replied.  He looked at me puzzled.  After we got home and I did some quick sewing, he understood.


Forty cents each!  What a bargain.

I found an old black hat that I used for snowboarding years ago, cut the straps off the eye mask, and whip stitched the mask onto the hat.  Easiest project ever.


Thursday, January 5, 2012

Personalized Eye Chart Valentines Wall Art

I love looking at the website RedEnvelope for gift ideas. I never really buy anything from them, as their stuff is too expensive for me, but I just like getting ideas. I happened to spot this personalized eye chart story of us wall art while I was perusing their site for a gift idea.  It is totally cute, but quite pricey at 80 dollars, so I decided to try to make it.  I'm always looking for cheap custom art.  I decided to make the template using Microsoft Word.  It was a little tricky getting the lines justified, but after I got it working it was a breeze (the trick is not to do a carriage return for each line).  I like the RedEnvelope version, but I like mine more because I made it truly personal, by putting in dates and real events.  At the end of this post I have linked the two word documents I used.  You can change up the font colors, sizes, and text (unless your last name happens to be Tang and you met your husband at an internship).  I did go a little crazy and made one for my husband and daughter.  These are so fun and easy to do, you could make one for every member of your family.  I'm still experimenting on DIY ways to transfer the image onto a canvas.  I may just get it printed on a canvas, through those photo canvas websites (that I always see so many Groupons for).

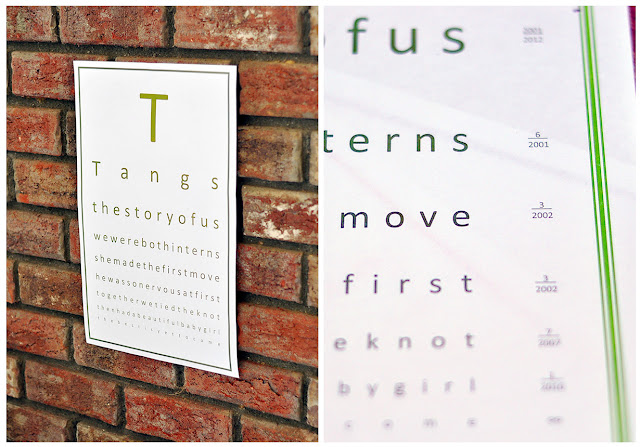
The first version I made didn't have dates on it, but I decided it was cuter with dates.  I made them look like the 20/20 distance numbers on a real eyechart.


This is the image version.  To convert a Microsoft document to an image, I printed the document to a pdf, opened the pdf in photoshop and save as a jpg there.  I think there are free word to image converters out there also.

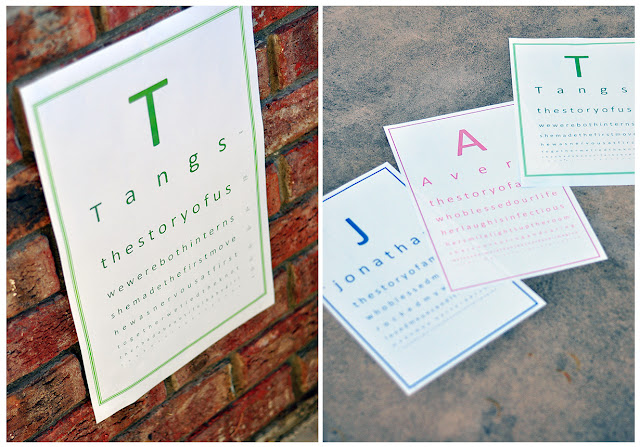
My other creations for my hubby and daughter.
Here are the word doc templates:
8.5x11
11x17
I uploaded it into google docs, but the formatting does not show up correctly through google docs.  You have to download the file and open it in Microsoft Word.

Update: A reader asked me how to update the border color.  In Microsoft Word 2003, to to Format->Borders and Shading -> Page Border Tab  You can remove the border or update the color or change the border style.  Another option is to copy and paste the text of the document into a new document.

Update2:  If any of your lines is too long, you will have to change the font size down until the lines fit.    You then would have to change all of the subsequent font sizes down to make it look consistent. Remember to use spare bar instead of enter and keep hitting space bar until the next sentence falls onto another line.  You could also expand the margins to make the whole line fit.  Another method in Microsoft Word is to force a justify by hitting shift+crtl+J.


A few things to note if you use these templates.
1. To get the justify correct on each line, do not use "enter"/newline/carriage return, just keep hitting space bar until the line drops down.  
2. The very last line has an "x" in white text.  That is there to get the paragraph justify correctly.  If you change the color of the text and select all, remember to change the x back to white.
3. All the dates on the side have an "x" next to them (again in white text).  This is so I could get the underline to go all the way across.  Again, if you change the text color, be sure to change those x's to white or else you're gonna have dates with x's in them.

Hope you guys have fun with this.  I surely did!


Pin It button on image hover