Showing posts with label Ornament. Show all posts

Wednesday, November 20, 2019

Glitter Origami Elephant Ornament Tutorial


I hate wasting wrapping paper.  You know when you cut the paper to fit a present and have a little bit left that is too small to wrap another present?  This is the perfect use for it: origami elephant ornaments.

Make these cute origami elephants this holiday.  I made a few to put on my stocking hangers and I also make some for our Christmas tree.  Origami ornaments are the best because they are cheap, they pack up small and they can be cute too.  

To make this ornament I used gold glitter wrapping paper scraps.  See my video tutorial here.

These little elephants are so cute I may keep them up year round.

Wednesday, December 4, 2013

How to Water Marble Nails and Christmas Ornaments


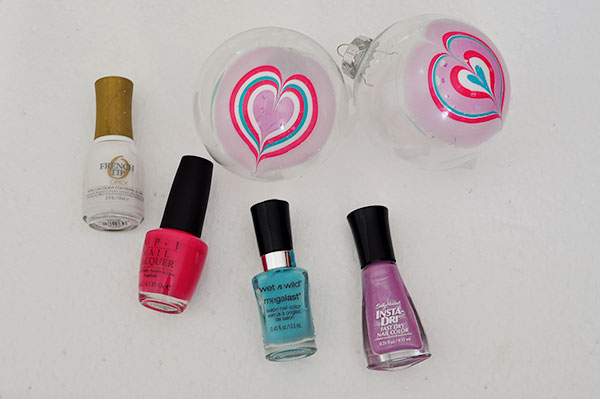
I had so much fun water marbling Christmas ornaments last year, I decided to do it again this year.  This time around I made a heart pattern and used a variety of colors.  I love this craft because it uses everything I already have at home, and its cheap, if I mess up I can simply use nail polish remover and remove the pattern.

Video tutorial found here.
I used Orly French White, OPI Party in My Cabana, Wet n Wild I Need a Refresh Mint, and  Sally Hansen Lovely Lilac.

You can use a clear ornament or an opaque one.  I like the clear ones because you can see the design through different angles.

I water marbled my mails also.  You can also see that tutorial in the videos below.  


Video tutorial for water marbled ornament heart here.

Please check out my other tutorials for fun Christmas ideas:
Salt Dough Gift Tags
Book Page Star Ornament

Kleenex Box Ornament


Wednesday, December 19, 2012

Record Your Childs Voice to Make a Custom Ornament

This is a simple tutorial of something that I love.  I made this custom voice ornament this Christmas.  I love it because it has my daughter's voice on it and I'll be able to cherish it for years to come.  To make this you need an fabric, felt or knitted ornament  (mine is from Target), recordable device (Amazon or Consumer Crafts has them), seam ripper, needle and thread and cotton balls (to fill the sides back of the ornament).

You want to pick an ornament that can be taken apart with a seam ripper and that is
large enough to hold the recordable device.  Record the message onto the device before you sew it in the ornament.

Using the seam ripper find a seam to remove that will fit the recordable device.  Remove the existing filling.
Mine had foam in it so I broke off the body part but left the foam in the head of the lion ornament.

Insert recordable device in (I added a little cotton to keep it fluffy.
Using a blind stitch sew back up the ornament.
Hang your ornament on the tree and enjoy it for years to come.

Here is a video of the ornament with my daughters voice:

Tuesday, December 4, 2012

How to Make a Faux Hand Blown Glass Ornament

I hate buying new materials for crafts.  Not only is it expensive, but my house is gets filled with clutter of items that I only use once or twice.  I wanted to paint my glass ornaments, but did not want to buy specialty glass paint for them.  From my previous water marble tutorials, here and here,  I know that nail polish works great on these ornaments.  The best nail polishes to use are the more translucent colors, and from my experimenting, the cheaper the polish the better it works (probably because it isn't as pigmented and lets more light shine through).

To make these faux hand blown glass ornaments, I just used nail polish and painted small to medium sized circles all around in a random pattern.  You don't really have to be neat, it gives it more of the hand blown glass look if your circles aren't perfect.

For the blue ornament I used Wet n Wild 415 A (this nail polish is at least 10 years old) and Revlon's Nail Art French Mix.  For the red ornament I used Elizabeth Arden glitter polish (this is also at least 10 years old, didn't Elizabeth Arden go out of business years ago?) and  Essie's Bone Chilling White (which is pretty translucent for Essie, I was highly disappointed when I used it on my nails, it takes at least 4 coats to get it opaque).


Use any nail polish, the more translucent the better.


Randomly paint on circle shapes of various sizes.  If you are putting colors on top of each other
 wait for one color to dry before applying another.

For the red ornament I did big splotches of white first and then small spots of red.
As always the best thing about working with nail polish is that if you do not like your design, just use nail polish remover and wipe it off.

Monday, November 19, 2012

Easy Glitter Mustache Christmas Ornament DIY

Who doesn't love the mustache trend?  I decided to create my own glitter mustache ornament.  I choose glitter because I thought it was funny to take a very masculine mustache and draw it in glitter.

Using any ball ornament draw a mustache with pencil.  I free handed it but you could also use a stencil.


Using glue and a paint brush fill in the mustache and sprinkle glitter.  Go a little outside you pencil lines
 so you won't see them when the glitter is applied.

Easy peasy glitter mustache ornament.


Monday, December 19, 2011

Easy Kids Craft - Foamies Ornament

With all the ornaments I have been making for my blog, my two year old daughter has been very curious and wanting to help. I decided to let her help me make some simple foamies ornaments. Just peal and stick. It kept her occupied for quite a long time.  After she finished begged us to go downstairs so she could hang on the tree.


This one is the ornament that Avery made.  I like the fact that she overlapped the foam, it gives it more dimension.


If you want to see Avery making the ornament here is a short video.

Thursday, December 15, 2011

How to Fold an Eight Pointed Transforming Ninja Star

When I was making my ninja ornament, my husband said I should fold an origami ninja star to go along with the ninja.  I had no idea what he was talking about, so he showed me how to fold one.  I ran with the idea and made his ninja star into a book page-ninja star-transforming-wreath-ornament.  If you read my blog regularly, you will see that I just fused five ideas from my previous blog posts together.  Below are the links to my previous blog post.

Mini Wreath
Book Page
Ninja
Stars
Ornament

I love this "ninja" star because it slides in and out to make this cool octagon.  My husband wasn't too thrilled about the little bow I drew onto his fierce ninja star.

For this star you will need 8 sheets of square paper all the same size.  Follow the video tutorial below to learn how to fold them and construct the star.

This is how to assemble the first four pieces, you do the same for the next four.  Details are in the video.

Half transformed.


Wednesday, December 14, 2011

How to Create an Emoticon Ornament ;)

These foam letters have been sitting in the back of my drawer forever. Here is a simple way to make an emoticon ornament. Just find the letters you need and stick them on. Could it be more simple? I was lucky that the letters came with parenthesis, but if yours doesn't you can cut it out from a letter C.  Mine didn't come with a comma so I took the inside of the letter O and cut it into a comma.  The period was the inside of the number 8.

I also spray painted my ornament because the paint was chipping off this really old ornament I found.


Friday, November 25, 2011

Candy Cane Marbled Monogram Ornaments

I recently saw a marbleized nail technique on Pinterest and was so inspired to try it.  After several attempts I finally got the nail technique down and decided to do something more unique with it. Taking the glass ornaments that I purchased from Michaels, I created a water marble ornament.  You can check out my video tutorials on  how to  marbleize an ornament and how to water marble nails.


I used Orly French White and OPI All Lacquered Up for these images.  These nail polish brands seem to work the best for this technique.  Drip the nail polish into the filtered water and use a toothpick to create your own pattern.


I also created a monogrammed marbleized image by cutting out the letter A from a sticker (you could user painters tape, I just had this sticker on hand) with an Exacto knife.  I used the negative part of the sticker (negative part meaning outline) and stuck it onto the ornament.  Painted one coat of clear nail polish then another coat of white nail polish.  Then I dipped the ornament into the water with the marbleized nail polish. Removed the sticker and used nail polish remover to clean up the edges.
Using a sticker or painters tape cut out a letter or design.  Stick onto ornament and paint one coat of clear.  The clear coat will help from the colors seeping though the edges of the tape. Then paint base color, I used white.   Then dip the ornament into the nail polish marbleized water.  Remove the sticker and clean up edges with nail polish remover.


Check out my latest post on making a heart shaped marble pattern: http://www.thecheesethief.com/2012/11/how-to-water-marble-nails-and-christmas.html

Ornament Video Tutorial
Water Marble Nail Video Tutorial

Pin It button on image hover