Showing posts with label Christmas. Show all posts

Wednesday, November 20, 2019

Glitter Origami Elephant Ornament Tutorial


I hate wasting wrapping paper.  You know when you cut the paper to fit a present and have a little bit left that is too small to wrap another present?  This is the perfect use for it: origami elephant ornaments.

Make these cute origami elephants this holiday.  I made a few to put on my stocking hangers and I also make some for our Christmas tree.  Origami ornaments are the best because they are cheap, they pack up small and they can be cute too.  

To make this ornament I used gold glitter wrapping paper scraps.  See my video tutorial here.

These little elephants are so cute I may keep them up year round.

Wednesday, December 4, 2013

How to Water Marble Nails and Christmas Ornaments


I had so much fun water marbling Christmas ornaments last year, I decided to do it again this year.  This time around I made a heart pattern and used a variety of colors.  I love this craft because it uses everything I already have at home, and its cheap, if I mess up I can simply use nail polish remover and remove the pattern.

Video tutorial found here.
I used Orly French White, OPI Party in My Cabana, Wet n Wild I Need a Refresh Mint, and  Sally Hansen Lovely Lilac.

You can use a clear ornament or an opaque one.  I like the clear ones because you can see the design through different angles.

I water marbled my mails also.  You can also see that tutorial in the videos below.  


Video tutorial for water marbled ornament heart here.

Please check out my other tutorials for fun Christmas ideas:
Salt Dough Gift Tags
Book Page Star Ornament

Kleenex Box Ornament


Wednesday, November 27, 2013

Christmas Decorations are Up!


Decorating the tree this year was extremely fun this year, but hectic at the same time.  Before I had kids I was very particular about how the ornaments on the tree looked.  Our tree had to look like a department store tree.  I always made it a point to only ornaments that matched our blue and silver color scheme.   I would plan out the placing of the ornaments so they are equally yet randomly distributed through the tree to give it an effortless look. Now with Avery and Lex our tree has become a mod podge of different ornaments the bulk of which placed at the bottom part of the tree (where the kids can place them).   Our tree has ornaments made by Avery as well as ones she picked out from the store.  Macaroni frames, cotton ball snowmen, glittered salt dough ornaments now adorn the tree.  I have to admit I like out tree better now.  I loved pulling out each of these "custom made" ornaments (that now have memories tied to them) out of the box.  

I created a timelapse video below to show you our decoration process.  It was so great having Avery decorate the tree and now worrying that it wasn't "perfect."  Lex was still too young for the process and just wanted to eat all the ornaments on the tree (not just the macaroni ornament).  Video here: https://www.youtube.com/watch?v=0C6NwLSmZns or below.  


Citi Tuesdays

This post brought to you by Walmart. All opinions are 100% mine.
The holiday season is officially here.  If you love the holidays, but want to still be mindful of your pocket book here is a great promotion.  Use your Citi® credit card on Citi Tuesdays on an eligible purchase of $100 or more while shopping on Walmart.com this holiday season, and receive a free $10 Walmart eGift Card.  This is online only, remember to make your purchases online.  I know I do most of my holiday shopping online nowadays.  It's so much nicer to be in the comforts of your own home and not have to deal with the crowds and the parking.
Citi® consumers that spend $100 or more on an eligible purchase on Walmart.com will receive a Walmart eGift card emailed to them weekly. The gift card will be emailed within 10 days after a qualifying Citi® credit card purchase occurs.
Who doesn't want an additional 10 dollars to shop with?
I shared on my instagram a cool knitting machine that I would love to buy for someone (possibly for myself). There were lots of really cool toys for crafty kids at Walmart.  The knitting machine was just one of many toys that I saw.  I love their selection of crafty toys for kids and the crafty adult. What are some things that you would spend the extra 10 dollars on?
The Nitty Gritty:
Terms and conditions:
To qualify for this offer, you must make a single-receipt purchase on Walmart.com of $100 or more (excluding taxes and shipping charges), by 11:59PM PT on Tuesdays, between 11/5/13 and 12/17/13, and pay for your purchase using an eligible Citi® credit card. Purchase may not include gift cards, Pharmacy, tires, Photo, customized or personalized items, Vudu, or Walmart To Go. Not valid on prior purchases or cancelled orders, and offer may not be combined with other offers or promotions. Applies to online purchases only. All Citi Branded consumer credit Cards, excluding business credit and professional cards, are eligible for the promotion; business credit cards and professional cards are not eligible. Limit one gift card per Citi® credit card, per Tuesday, per purchase of $100 or more. If a qualifying purchase is made, a Walmart eGift Card in the amount of $10.00 will be emailed within ten days of the qualifying purchase to the email address provided. A valid email address must be supplied at time of purchase to obtain a Walmart eGift Card. Use of the Walmart eGift Card is subject to the Walmart Gift Card Terms and Conditions, available on Walmart.com (at http://help.walmart.com/app/an…. Offer valid in the 50 United States only. Offer valid until 12/17/13. However, this offer is subject to modification or termination without notice

Wednesday, December 19, 2012

Record Your Childs Voice to Make a Custom Ornament

This is a simple tutorial of something that I love.  I made this custom voice ornament this Christmas.  I love it because it has my daughter's voice on it and I'll be able to cherish it for years to come.  To make this you need an fabric, felt or knitted ornament  (mine is from Target), recordable device (Amazon or Consumer Crafts has them), seam ripper, needle and thread and cotton balls (to fill the sides back of the ornament).

You want to pick an ornament that can be taken apart with a seam ripper and that is
large enough to hold the recordable device.  Record the message onto the device before you sew it in the ornament.

Using the seam ripper find a seam to remove that will fit the recordable device.  Remove the existing filling.
Mine had foam in it so I broke off the body part but left the foam in the head of the lion ornament.

Insert recordable device in (I added a little cotton to keep it fluffy.
Using a blind stitch sew back up the ornament.
Hang your ornament on the tree and enjoy it for years to come.

Here is a video of the ornament with my daughters voice:

Thursday, December 6, 2012

More Christmas Wrapping Ideas: Burlap

My sister gave me a bunch of extra burlap scraps from her burlap wreath project.  They have been sitting in my closet for over a year, so I finally dug them out and decided to use as embellishments for wrapping my gifts.  As I mentioned in my previous post, I love using craft paper as wrapping paper.  It provides such a neutral base for wrapping.

I used ribbon and my salt dough gift tags to dress up the burlap.  I even attempted to make a burlap rose for one of the gifts.  All in all I love the way it turned out.


This one is my favorite wrapping.  Simply fold over the burlap and secure in the middle with bakers twine to make
 a big bow.  Add the salt dough gift tag, and viola, how cute is that?


Tuesday, December 4, 2012

How to Make a Faux Hand Blown Glass Ornament

I hate buying new materials for crafts.  Not only is it expensive, but my house is gets filled with clutter of items that I only use once or twice.  I wanted to paint my glass ornaments, but did not want to buy specialty glass paint for them.  From my previous water marble tutorials, here and 
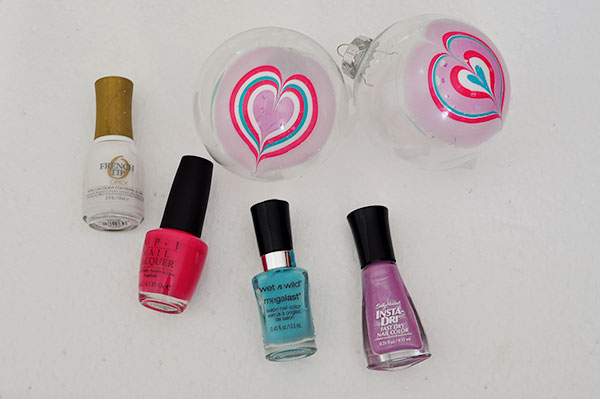
here,  I know that nail polish works great on these ornaments.  The best nail polishes to use are the more translucent colors, and from my experimenting, the cheaper the polish the better it works (probably because it isn't as pigmented and lets more light shine through).

To make these faux hand blown glass ornaments, I just used nail polish and painted small to medium sized circles all around in a random pattern.  You don't really have to be neat, it gives it more of the hand blown glass look if your circles aren't perfect.

For the blue ornament I used Wet n Wild 415 A (this nail polish is at least 10 years old) and Revlon's Nail Art French Mix.  For the red ornament I used Elizabeth Arden glitter polish (this is also at least 10 years old, didn't Elizabeth Arden go out of business years ago?) and  Essie's Bone Chilling White (which is pretty translucent for Essie, I was highly disappointed when I used it on my nails, it takes at least 4 coats to get it opaque).


Use any nail polish, the more translucent the better.


Randomly paint on circle shapes of various sizes.  If you are putting colors on top of each other
 wait for one color to dry before applying another.

For the red ornament I did big splotches of white first and then small spots of red.
As always the best thing about working with nail polish is that if you do not like your design, just use nail polish remover and wipe it off.

Monday, December 3, 2012

How to Make a Space Invaders Ornament

It's so hard to find something that my husband would like.  It's especially hard to make something for him (other than food) that he finds cool, until I made hims this Space Invaders ornament.

I have a Cricut Mini, but as I said before, its not very useful when you want to cut your own designs.  To cut this space invaders vinyl I printed out this image that I found on the internet.  I did multiple sizes because I wasn't sure which one would fit the best.  After finding the best fit I cut out the image and taped it onto a piece of black contact paper.  Then I used and exacto knife to hand cut the image (which isn't as hard as it sounds).  You do want to shift the pixels over a little on some of the diagonal pieces so the image is attached on a small corner.


Print out image.

Tape on top of contact paper and cut out.

Stick on ornament.

Wednesday, November 28, 2012

How to Make Book Page Wrapping Tags

I have a love hate relationship with my Cricut Cut Mini.  I like it because it's nice to have a cutting machine to cut out letters, but the fact that I have to use cartridges makes it very restricting.  If I had to go back I would probably get a Silhouette.  None the less I can't go back so I just have to make due.

For the most part I use the Cricut to cut out letters.  I only have one cartridge so I only have one font, its a nice font so I don't mind so much.

To spice up my craft paper wrapping I decided to cut out the names using old book pages.  I love the look. it really adds something personal to the wrapping paper.


\


Wednesday, November 21, 2012

How to Make Your Own Wrapping Paper with Craft Paper

I love simple wrapping paper.  I especially love brown paper bags or craft paper as wrapping.  It has such a rustic feel to it.  Using one of my daughters stamps I embellished the craft paper by stamping the pattern on semi randomly.  It turned out marvelous, but still simple and rustic.  This is also a great way to get your kids helping in the wrapping of gifts during the holidays, or at least occupied so you can get gifts wrapped.


This was an Easter stamp that my daughter had.  


I eyeballed the stamps and placed them in a stripped pattern.  It doesn't have to be perfect (makes it look more rustic).

A little bakers twine and viola easy wrapping!  I also used my favorite set of stamp letters to make a simple gift tag (which I bought at Michael's but they also sell a similar one on Amazon).  These stamp letters are great if you hate your handwriting (like I do).


Monday, November 19, 2012

Easy Glitter Mustache Christmas Ornament DIY

Who doesn't love the mustache trend?  I decided to create my own glitter mustache ornament.  I choose glitter because I thought it was funny to take a very masculine mustache and draw it in glitter.

Using any ball ornament draw a mustache with pencil.  I free handed it but you could also use a stencil.


Using glue and a paint brush fill in the mustache and sprinkle glitter.  Go a little outside you pencil lines
 so you won't see them when the glitter is applied.

Easy peasy glitter mustache ornament.


Friday, November 25, 2011

Candy Cane Marbled Monogram Ornaments

I recently saw a marbleized nail technique on Pinterest and was so inspired to try it.  After several attempts I finally got the nail technique down and decided to do something more unique with it. Taking the glass ornaments that I purchased from Michaels, I created a water marble ornament.  You can check out my video tutorials on  how to  marbleize an ornament and how to water marble nails.


I used Orly French White and OPI All Lacquered Up for these images.  These nail polish brands seem to work the best for this technique.  Drip the nail polish into the filtered water and use a toothpick to create your own pattern.


I also created a monogrammed marbleized image by cutting out the letter A from a sticker (you could user painters tape, I just had this sticker on hand) with an Exacto knife.  I used the negative part of the sticker (negative part meaning outline) and stuck it onto the ornament.  Painted one coat of clear nail polish then another coat of white nail polish.  Then I dipped the ornament into the water with the marbleized nail polish. Removed the sticker and used nail polish remover to clean up the edges.
Using a sticker or painters tape cut out a letter or design.  Stick onto ornament and paint one coat of clear.  The clear coat will help from the colors seeping though the edges of the tape. Then paint base color, I used white.   Then dip the ornament into the nail polish marbleized water.  Remove the sticker and clean up edges with nail polish remover.


Check out my latest post on making a heart shaped marble pattern: http://www.thecheesethief.com/2012/11/how-to-water-marble-nails-and-christmas.html

Ornament Video Tutorial
Water Marble Nail Video Tutorial

Pin It button on image hover