Tuesday, November 29, 2011

Salt Dough Ornaments and Gift Tags


You gotta love Pinterest. I find so much inspiration on there such as salt dough ornaments. I've never even heard of salt dough before.

Here is the recipe for salt dough:
1 cup salt
2 cups flour
1 cup warm water

Mix all ingredients together in a big bowl and kneed until play doh consistency. Roll out, cut and out with cookie cutters.  I used stamps to decorate, but you could also let it dry completely and paint on them.

Below are gift tags that I made.  Be sure to cut the holes on the top with a straw before the dough dries.  Drying can take up to three days.  You could do it in the oven at a very low temperature (200 degrees) but the ornaments will puff up a little.

Update:  I have received many questions about where how i stamped the text.  I used rubber stamps similar to these ones here on amazon.  To color the stamps I used a stamp pad for some and just a crayola marker for others.
Left image are the stamps I used.  Purchased at the dollar section from Michaels.
The two ornaments on the far right that have the little indent are thumb prints of my daughter and nephew.

Stamping before cutting the shape out makes it much easier.


Let the kids make some too!


The one on the left is dry.  I was a little surprised at the texture after it dried.  My friend came over and asked me if he could eat one.


Friday, November 25, 2011

Candy Cane Marbled Monogram Ornaments


I recently saw a marbleized nail technique on Pinterest and was so inspired to try it.  After several attempts I finally got the nail technique down and decided to do something more unique with it. Taking the glass ornaments that I purchased from Michaels, I created a water marble ornament.  You can check out my video tutorials on  how to  marbleize an ornament and how to water marble nails.


I used Orly French White and OPI All Lacquered Up for these images.  These nail polish brands seem to work the best for this technique.  Drip the nail polish into the filtered water and use a toothpick to create your own pattern.


I also created a monogrammed marbleized image by cutting out the letter A from a sticker (you could user painters tape, I just had this sticker on hand) with an Exacto knife.  I used the negative part of the sticker (negative part meaning outline) and stuck it onto the ornament.  Painted one coat of clear nail polish then another coat of white nail polish.  Then I dipped the ornament into the water with the marbleized nail polish. Removed the sticker and used nail polish remover to clean up the edges.
Using a sticker or painters tape cut out a letter or design.  Stick onto ornament and paint one coat of clear.  The clear coat will help from the colors seeping though the edges of the tape. Then paint base color, I used white.   Then dip the ornament into the nail polish marbleized water.  Remove the sticker and clean up edges with nail polish remover.


Check out my latest post on making a heart shaped marble pattern: http://www.thecheesethief.com/2012/11/how-to-water-marble-nails-and-christmas.html

Ornament Video Tutorial
Water Marble Nail Video Tutorial


Tuesday, November 22, 2011

Homemade Cornstarch Paint

Happy Thanksgiving!

Here is a craft for the little ones to keep them occupied while you are cooking, or trying to get a peaceful moment to you can shop the Black Friday presales.

I was taking care of my daughter and nephew this week.  They are both almost 2 years old so I wanted to do some crafts with them.  I decided to make some homemade paint for them to paint with.  I called my friend who is an expert on these DIY toddler crafts and she suggested cornstarch paint.  I liked this cornstarch paint because you could use more cornstarch to thicken it so it wouldn't be as messy.  I added a little extra cornstarch which was great in the beginning, but because a little too thick by the time the kids were finished painting.

Here is the unaltered recipe:
1 tbs of cornstarch
1 cup of room temperature water
1 drop of food coloring of choice
1 small pot to cook the paint

Mix cornstarch and water together in pot.  Turn on stove to medium high heat and wait for cornstarch to thicken.  Stir until smooth.  Take pot off heat and place cornstarch mix into separate cups.  Add food coloring to each cup and mix, or you can have the kids carefully mix it with a spoon. Let cool to room temperature before you give it to kids.


Rainy Weekend Folding Stars

It was a rainy weekend.  We stayed in and folded stars out of the Sunday newspaper.  Avery loves playing with these stars, she likes to gather them into a cup, and take one out at a time, then smash them with her little palms until they are flat.

We strung together the stars after she was done playing with them and hung them on our mantel.


Star tutorials here: video or text.  Video tutorial is easier to follow.

Monday, November 21, 2011

Book Page and Cardboard Kleenex Box Ornament

Here is a tutorial on how to take an ordinary Kleenex box and make it into an ornament. I start by cutting 6 strips of cardboard, cut with an exacto knife and ruler (for the Kleenex box ornament I cut it .375 inches wide by 9 inches long).  Then using 5 strips interlock them to make a star.  The sixth strip is the center ring to interlock.  Please look at the video tutorial (part 1 and part 2) for full instructions.

I also made one out of a page from a magazine.  When making it out of paper you want to make sure they paper is thick enough, so I glued two sheets of paper together. For magazine pages I used .5 inches by 9.5 inch paper.

The dimensions I stated are the minimum lengths, in proportion to the width.  You could go as long as you want and keep the same width.  But you cannot go wider and keep the same length.  The longer you go the looser the ball will be.


Video tutorial is here: part 1 and part 2.

A reader just updated me that this ball is called Greek Soccer Ball by Kunihiko Kasahara.  I was taught how to make this in high school by a friend so I never knew what it was called.  Thanks Maria!

Friday, November 18, 2011

Rosemary Filled Ornaments

I love rosemary for so many reasons. It's such a hardy plant that is so easy to propagate. To propgate simply snip some new growth remove the bottom leaves and stick it into the soil. The clipping should root without much effort.

Rosemary is a great herb to cook with.  During the holidays we usually make Roasted Rosemary Garlic Potatoes, which just makes the house smell divine.

Towards the late summer our rosemary starts to flower with these beautiful purple flowers.  I thought it would be great to someone save these flowers, and because rosemary is such a hardy evergreen plant it would hold up to being put into glass ornaments.

Cut rosemary from garden.

Stuff the rosemary into glass ornaments.


Wednesday, November 16, 2011

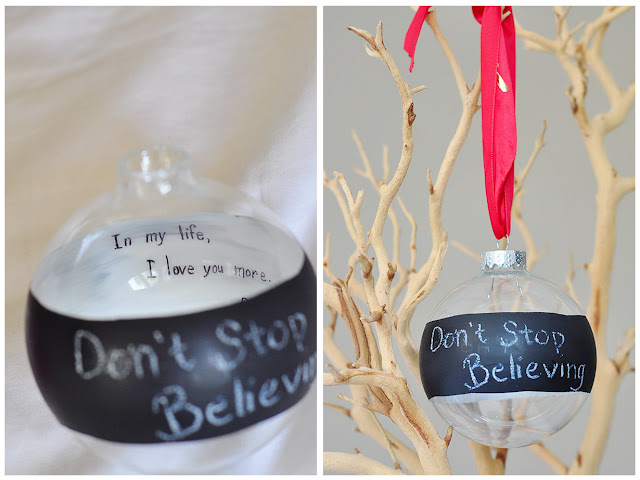
How to Create a Chalkboard Paint Ornament with Hidden Message

Who doesn't love chalkboard paint? For me, I love the reminiscent quality of chalk and how it brings me back to childhood, where my biggest concern was if I would get the coveted job of cleaning the chalkboard erasers by tapping them together outside.  The puff of white dust always looked so magical to me.  I am not a sports person, but I love seeing Lebron James start the game by throwing the chalk dust into the air.   The white dust looks like a signal, a declaration that this is the beginning, that he has arrived and that nothing is going to stop him.

Here is my tutorial on how to create a chalkboard paint ornament that has a hidden message in the interior.

Tape ornament around where you do not want it to be painted.  I cut "fringe" to make it easier to maneuver.

For this ornament I wanted to have a message that could be also seen on the inside.  Write a message backwards with a sharpie so when read through the glass it will be forwards.  It did take me a little bit of thought, but if you mess up you can use nail polish remover to wipe away the sharpie.
Paint over the words you wrote with white primer.  When dry paint over with black chalkboard paint.  I used chalkboard  spray paint.

Tuesday, November 15, 2011

Terrarium Ornament

I purchased a bunch of these clear glass ornaments on clearance last Christmas. The possibilities are endless for these ornaments, one idea I had was to create a terrarium.  The round glass encapsulates the plant well and the clear glass just makes it look so sophisticated and modern.  The one warning I do have is that it is a little complicated to get the small rosemary clipping positioned into the hole.  The rosemary may outgrow this glass bowl in a month (or may not even survive), but I still love how it looks.  Rosemary is very easy to propagate, just clip young growth, remove bottom leaves and place into soil.  The clipping should root in a few weeks.  For this terrarium, I propagated rosemary a month earlier and transplanted into this ornament.

This reminds me of Charlie Brown's Christmas tree.  Notice I used a folded origami star to hang off one of the "branches".

Fill ornament with soil, add a little water, and using a paint brush I cleaned the sides of the ornament and compacted the a little before placing the rosemary plant inside.  I don't know if it will survive, but I'll keep you posted.


Saturday, November 12, 2011

The Jolly Ranchers, The Tootsie Roll, The Cheese Thief and the Metamorphosis

Jolly Ranchers, Tootsie Rolls and Me.

What do these three things have in common?

They are always the last picked.  When I was in grade school, I wasn't athletic or popular, which is two strikes when picking teams in gym. More often than not I was one of the last picked, always a difficult decision between me and the boy who wet in his pants because he was so nervous for a the spelling bee. At least I won out to "Pee Pee Paul".. most of the time.

It is almost two weeks after Halloween.  Look in your candy bucket, what's left?  In our family it's always Jolly Ranchers and Tootsie Rolls.  At work, when my teammates bring in leftover Halloween candy, the bag is always brimming with Jolly Ranchers and Tootsies Rolls.  Even if they bring in other candy, the chocolate always goes first, then the Skittles and Starbursts, then the other non-candy like pretzels, but the poor Jolly Rancher and Tootse Rolls are left at the bottom of the tattered ziploc bag.

I am here to bring new life into these candy outcasts, you could call it "candy up-cycling."  Gather up the Jolly Rancher and Tootsie Rolls and prepare for the metamorphosis.  By simply melting Jolly Ranchers you can create the butterfly candy seen below.


First we make the wing molds out of an old soda can.
It looks as though I'm going to make stars out of a Pepsi Can!  But I'm not, just making butterfly wing molds.
Cut soda can open and cut into half inch by six inch strips.  Then mark the strips as follows with a  marker at the following lenghts:
.25 inches, 1.5 inches, 2.75 inches, 5.4 inches.  These will be the marks where you fold.
You want to make an even number of strips, as butterflies have two wings.

1. Line up ends of strips and fold over twice (this should secure the can together).
2. Notice that the can now stays together wthout holding.  Do this for all the strips.
3. Find the second marking that is 1.5 inches.
4. Fold over to make a "D" shape
5. Find the third marking (2.75 inches) and fold over slightly
6. Find the fourth marking and fold inwards.  So it looks like a "B".  This is the mold for the butterfly wings.  You can tweak the aluminum as you please to make it less pointy.  I pushed it to make it more curvy on the bottom.
Next step is making the crushing the candy
1. Put jolly rancher onto a piece of parchment paper.
2. Create a packet by sealing all sides.  (This is important, or else your kitchen will be a mess!  Trust me I know.)
3.  Take a pan and bang at the candy a couple of times.
Put something underneath before you smash the candy, as you do not want to damage your counter tops.
4. Candy should come out in small pieces.
5. Spray a little non stick cooking spray on molds. Place the molds on a baking dish lined with parchment paper. Fill the molds.  Try not to leave any open spots.
6. Preheat oven to 295 degrees Fahrenheit  and place in oven for 5 minutes or until candy is melted.
Take candy out of oven once it is melted, as always when working with sugar it is very hot!  So be careful.
If some areas of the butterfly wings were not filled in because there was too little sugar you have two options.  One is to take a toothpick and move the sugar into the spot (if area is small enough, and you work fast).  The other is to wait for candy to cool silghtly,  add more candy and place back in oven for another five minutes or until candy melts.  You want to make sure you do not overheat the candy because it will turn yellow to brown.
Sugar will cool fairly quickly.  So once its warm to the touch you can take out the folded ends and release the wings.
  The wings will become more brittle as it cools.
If you break the wings, you can piece it back together on the baking sheet and reheat in the oven for a couple of minutes.
Unmolded jolly rancher butter fly wings.


Thursday, November 10, 2011

Book Page Stars Ornament

Are you sick of my star posts yet? If you are, I have good news, this is my last one. If you aren't please read on.  This is post is inline with the Pinterest Challenge, where I took inspirations from Pinterest and created something with the inspirations.

My inspirations were Book Page crafts such as the Book Page Wreath and filled glass ornaments.  This is what I came up with.


Book page folded origami stars

Cut book page into strips and fold into star

Fill into glass ornament.
How to fold stars here.  Note: Video is updated!

Monday, November 7, 2011

So Now What Do I Do with All These Cellophane Stars?

In my previous tutorials I showed you how to fold stars and cranes out of cellophane.  One question you may have is what do you do with these things now?  Here is what I plan on doing with the stars and cranes.  For the cranes I simply string them with thread and hang them as Christmas ornaments.  For the stars you can buy those clear glass ball ornaments and fill them.  I also up cycled metallic packaging from a chocolate chip package (you can also use potato chip bags) and made more stars out of those.  Another idea for the stars is to string them all with thread and use them as garland around the tree.


1.  Take any packaing with metallic background.  I used chocolate chips, potato chip bag works also.
2. Cut open and clean the inside.
3.  Cut into strips and follow the star folding instructions.


How to fold stars here.  Note: video is updated!

Wednesday, November 2, 2011

How to Fold Glass-like Origami Cranes

When I was a nine years old, my cousin told me that anyone who folds a thousand cranes would get one wish. Foolish as I was, I sat in my room for countless weekends folding paper cranes. What was I going to wish for? A childhood crush to reciprocate his feelings. I never did make it to a thousand cranes. My hands started cramping up at a couple of hundred and I ran out of space to store the cranes. My childhood crush never did reciprocate, but one good thing did come of it all - I'm am very good at folding paper cranes. But a paper crane, that's too boring for this blog post. There are tons of how to's online.  For this tutorial, I want to show you how to recycle old plastic cellophane packaging into a glass like crane.

Instead of using origami paper, I used a piece of cellophane packaging from a greeting card.  You can use any cellophane (from flower wrapping, the packaging of stickers, stationary etc).  You just want to make sure its not to thin (do not use saranwrap, it will not work).  Cut the cellophane packaging into a square and follow the crane origami tutorial (different link from above, same concept).  The clear plastic sparkle and glisten in the light making them looks as magical and mystical as I once thought they could be.

1. Find cellophane wrapper.
2. Remove contents
3. Cut the package open, fold diagonal to create a square
4. Result is cellophane square to start folding with


Stay tuned for the stars cellophane tutorial.

Check Me Out at Once A Mom

I'm a guest blogger at Once A Mom.  Come and check me out to see how I dip sugar cookies into chocolate and decorate them with gumpaste flowers.
Pin It button on image hover