I totally forgot to post this up. I know it is after the holidays but I figured I mine as well post up these pictures, just in case you are shopping and happen to find an apothecary jar drink dispenser on sale or something. I wrote in a previous post on how I use it as a drink dispenser and to display my collection of wine corks. This Christmas I found another nifty use for it. I was able to remove the dispenser spout and string Christmas lights into the bottom dispenser hole. This makes the apothecary drink jar triple duty. The lights you use should not have connections outlets on both ends (for stringing them together) or else the cord will not fit through the hole. I purchased my lights at Walmart; they are single stranded with a plug only on one side. I want to find another one of these jars, but are sold out at World Market. I'll have to check again to see if they restocked. For Valentines day, I may do a lighted Valentine's day display by replacing the ornaments with candy hearts or heart shaped cookie cutters. I love this jar because without the dispenser hole, the lights would have to come up over the top, making the lid impossible to close. One tip I have is to hide the spout inside the jar, so when its time to use it as a drink dispenser you know exactly where you put it.
Showing posts with label Decorating. Show all posts
Tuesday, January 3, 2012
Tuesday, October 25, 2011
Double Duty Apothecary Jar
I love things that have dual function. While our house isn't small nor is it big either, I hate decorative items that have form and no function. This is why I love this Apothecary Jar, which is actually a water dispenser. I just hide the spout when I display it on the mantel.
I've seen these jars everywhere, such as ZGallerie and Costco. I purchased mine at Cost Plus. During the holidays, it usually goes on sale for 20 dollars. If you are part of their rewards program they email 10 off 30 coupons, which makes it even a better deal.
| Our mantel |
| Apothecary Jar filled with corks. |
| When I have a party I take it down and rinse and put in beverage. Yay, for double duty. |
Labels:
Decorating,
Double Duty,
Mantel
Monday, October 10, 2011
Easy DIY Wall Decals
Using contact paper found at almost any store I googled for some bird silhouette patterns. Tape the pattern onto the contact paper, cut it out and stick onto wall. You want to make sure that the contact paper won't damage your paint, but sticking a small piece onto a hidden area. This is something that also could be done with those fancy Cricut Cut/Silhouette machines, but I just used a scissor.
Labels:
Decorating,
DIY,
Tutorial
Saturday, October 1, 2011
If You Were a Flower Which Flower Would You Be? and Why?
This question was posed to me at an interview. I know weird right? It kind of caught me off guard, considering most interview questions thrown at me are "What each layer of the Open Systems Interconnection Model?" or "Write a function for the Fibonacci sequence". I had to think hard about this one. Flower, I dont even know that many types of flowers, rose? (too girly), tulip(too weak) dandelion (omg, i think that's a weed right?), what else? I only know three types of flowers?! Think, think, then I blurted out cactus (shoot, that isn't even a flower!) Plant...flower... I wasn't applying for a botanist position. And why cactus? Because they are strong, can survive anywhere with little maintenance, and will form roots in the roughest of conditions. Good answer right? I didn't get the job.
I do have an affinity towards cactus, perhaps because its because my mother always loved to plant succulents. Or it could be because they are one of the only plants that survive my brown thumb. Below are some pictures of a sort of terrarium. Although not the true definition of a terrarium, it has the same encased beauty. Tutorials seen in many blogs such as this one.
Labels:
Decorating,
DIY,
Terranium,
Tutorial
Tuesday, September 27, 2011
Jewelry/Photo Board
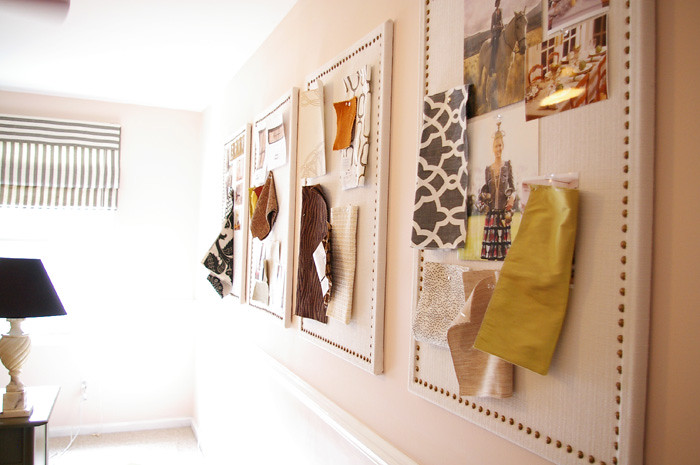
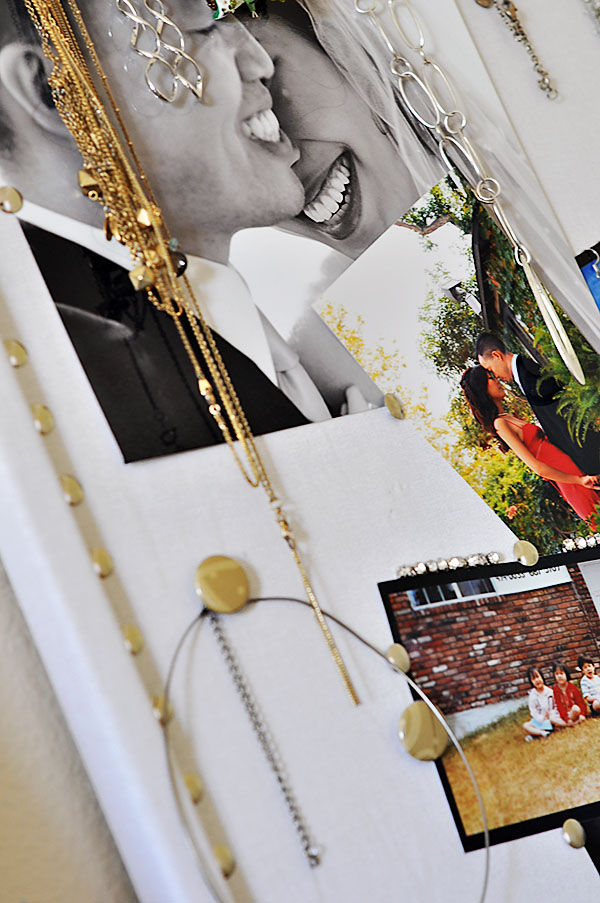
I have always loved these Inspiration Bulletin Boards by Bryn Alexendra made from a simple cork board. I decided to make one and put some inspirations, but also as a place to hang my jewelry.
![]() |
| Bryn Alexandra's boards. |
![]() |
| Instead of nail heads I used push pins that are available at any office supply store. |
![]() |
| Wedding pictures and jewelry. |
![]() |
| Put some sentimental pictures up also. |
![]() |
| Jewelry/Photo Board |
Labels:
Buletin Board,
Decorating,
Tutorial
Friday, September 23, 2011
Extra Long Coat Rack Tutorial
|
|
I have been looking for an extra long coat rack forever. With no avail, I decided to make my own 5 foot long coat rack.
The materials and instructions are as follows:
1 7in x 5ft x 1 in piece of wood (I used pine from home depot and had the cut to size. It was less than 6 dollars if I recall.)
5 Cast Iron hooks ( I purchased mine off ebay. They needed some tlc as they had rust on them, so I scrubbed them with Bar Keepers friend and spray painted)
10 One inch wood screws
3 Two inch wood screws to mount coat rack to wall
1 screwdriver
1 drill
For wood I distressed it using a hammer and a chisel. This is not an exact science so just go at it and get out all your stress. For a darker stain I would distress more, as the stain does tend to hide the marks.
After wood is distressed, stain with desired wood finish, do a couple of coats to get desired color and let dry. Cover with a coat of polyurethane. Let dry overnight.
Measure out the hook locations. For my 5 foot wood, I had 5 hooks, the first hook starting at 6 inches, second at 18, third at 30, fourth at 42 and fifth at 54, leaving 6 inches on each side.
Predrill small pilot holes for the hooks if wood is too hard to place screws directly in.
Attach coat hooks onto wood using 1 inch wood screws.
To mount the coat rack I found the studs and screwed the coat rack directly into the wall using the 2 inch wood screws. Since this is a coat rack that will see much use, I highly recommend finding the studs, or at least using the proper anchors to attach to your wall.
The screws I bought were steel color so I took a black sharpie and colored over them. :)
| My empty wall. |
| Cast Iron Hooks from Ebay (20 for 30 dollars, in bad shape but nothing that spraypaint and Bar Keepers Friend couldn't fix). Bar Keepers friend does remove rust BTW. |
| Some of the materials displayed. |
| Final coat rack. |
| Distressed the wood using a chisel and hammer. |
Labels:
Coat Rack,
Decorating,
DIY,
Tutorial
Subscribe to:
Posts (Atom)