Showing posts with label Holiday. Show all posts

Thursday, October 3, 2013

Reuse Easter Eggs for Halloween Decorations


I don't know how I ended up with so many Easter eggs.  Each year after Easter I buy a bag or two for the following year.  This year I ended up with a couple of boxes of Easter eggs.  I dug out all the green, white and orange ones for Halloween.  They worked out pretty well and now I can use put candy in them for party favors at my daughter's school.  Just a little decoration with a sharpie and viola, Easter in October. Who know's maybe we'll have a Halloween Egg Hunt.


Mixing it up for some fun.  My daughter really got a kick out of this.


Wednesday, January 18, 2012

Book Page Corner Heart Origami Bookmark


This is another heart tutorial.  Is the 'book page' trend over yet?  I sure hope not, because I just love the look of this corner bookmark folded from a book page.  The great thing about origami is that it is cheap and anyone can do it - with the proper instructions.  

When I was a kid, my parents bought me an origami book (from Thailand, all in Thai!).  I was so excited to get it until I started to attempt to make the figures.  Have you ever seen the diagrams in an origami book?  There are a lot of arrows, some that swirl around and point back to the same spot.  And my book was in Thai, so when I asked my parents to translate the words for me they would say "its says 'Fold Over'"  You could imagine how frustrating this was for an eight year old.  I'd like to say it was perseverance that helped me figure out most of the instructions, but I think it was just pure boredom that drove me to sit and decode it all.

I still see origami instructions out there that completely confuse me.  This corner heart was from that old origami book my parents gave me.  I actually lost the book, but remember making this.   I hope you enjoy my video tutorial on how to create this cute book mark for someone this Valentine's Day.  There are no confusing squiggly lines to follow just my hands to guide you through it.

I used a book page for this but origami paper would make awesome book marks also.  The nice thing about origami paper is that you don't have to cut it yourself (if you are making lots of these).  I love this origami paper from Amazon.  If you go to the Japanese dollar store they should have lots too (Daiso is the name of the Japanese dollar store in our area).

Monday, January 16, 2012

How to Make a Puffy Origami Heart Garland

This is probably going to be heart week. With Valentine's Day coming up I have so many heart tutorials I want to share. My camera is full of heart crafts! Here is a simple one and one of my favorites. It just requires some paper and yarn. Please view the video tutorial for the full instructions. I used wrapping paper to make these hearts. If your paper is thin then you want to use longer sheets of paper, or it will be difficult for you to "puff" the hearts. The proportions I uses are 1x5 (ie for 1inches by 5 inches, 1 cm by 5 cm, 2 cm by 10 cm etc). If you use thicker paper you can get away with 1x4 or maybe less.
String hearts together with yarn or bakers twine.

The basic step is to fold a triangle from a strip of 2inch x10inch paper.  See video tutorial for full steps.


Sunday, January 15, 2012

Woven Drinking Straw Heart

If you're at your McDonald's and the kid's need some entertaining, try weaving a heart out of some straws. All you need is two straws and scissors. You could also weave this heart from paper strips. Cut the strips to about 1 cm thick and 30 cms long. Follow the video tutorial on how to weave the heart below. This would be perfect to make one our two and stick them on a home made Valentine's Day card. You could also string them together and make heart garland.
First image is two drinking straws, one bent over the other to form a V.  Follow the video tutorial for further steps.


Direct youtube link to video tutorial.

Thursday, January 5, 2012

Personalized Eye Chart Valentines Wall Art

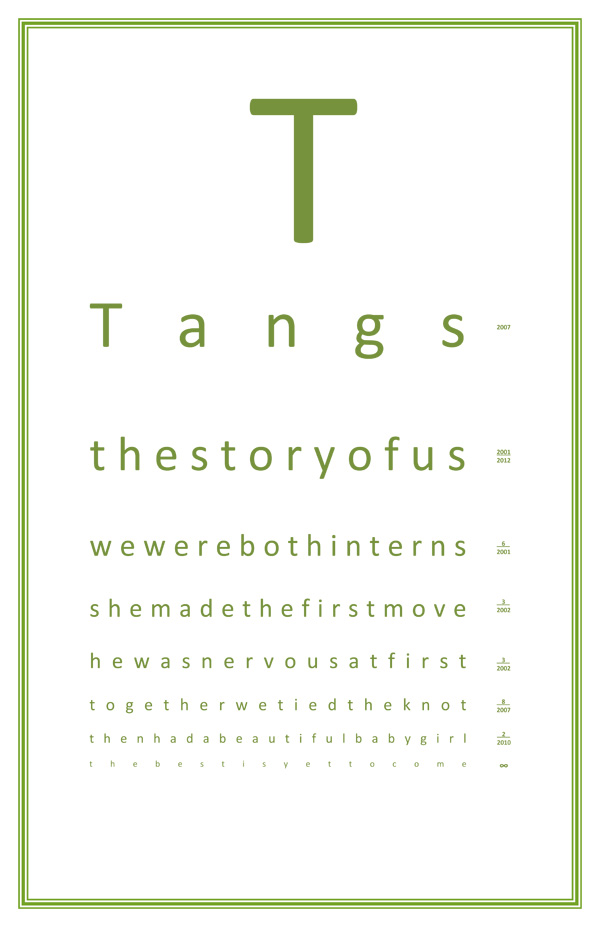
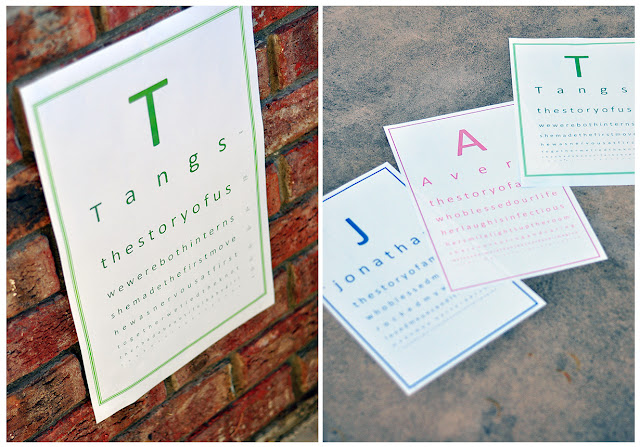
I love looking at the website RedEnvelope for gift ideas. I never really buy anything from them, as their stuff is too expensive for me, but I just like getting ideas. I happened to spot this personalized eye chart story of us wall art while I was perusing their site for a gift idea.  It is totally cute, but quite pricey at 80 dollars, so I decided to try to make it.  I'm always looking for cheap custom art.  I decided to make the template using Microsoft Word.  It was a little tricky getting the lines justified, but after I got it working it was a breeze (the trick is not to do a carriage return for each line).  I like the RedEnvelope version, but I like mine more because I made it truly personal, by putting in dates and real events.  At the end of this post I have linked the two word documents I used.  You can change up the font colors, sizes, and text (unless your last name happens to be Tang and you met your husband at an internship).  I did go a little crazy and made one for my husband and daughter.  These are so fun and easy to do, you could make one for every member of your family.  I'm still experimenting on DIY ways to transfer the image onto a canvas.  I may just get it printed on a canvas, through those photo canvas websites (that I always see so many Groupons for).
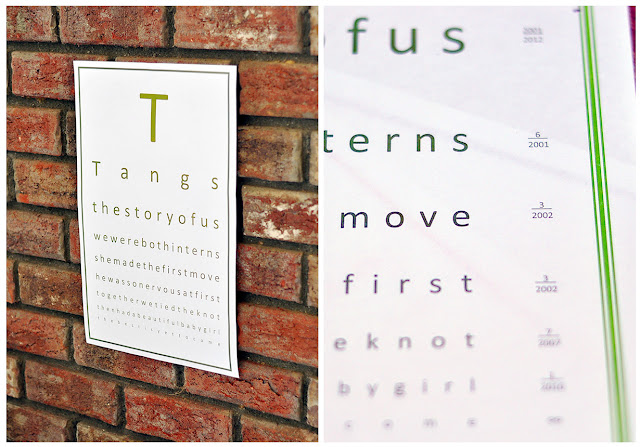
The first version I made didn't have dates on it, but I decided it was cuter with dates.  I made them look like the 20/20 distance numbers on a real eyechart.


This is the image version.  To convert a Microsoft document to an image, I printed the document to a pdf, opened the pdf in photoshop and save as a jpg there.  I think there are free word to image converters out there also.

My other creations for my hubby and daughter.
Here are the word doc templates:
8.5x11
11x17
I uploaded it into google docs, but the formatting does not show up correctly through google docs.  You have to download the file and open it in Microsoft Word.

Update: A reader asked me how to update the border color.  In Microsoft Word 2003, to to Format->Borders and Shading -> Page Border Tab  You can remove the border or update the color or change the border style.  Another option is to copy and paste the text of the document into a new document.

Update2:  If any of your lines is too long, you will have to change the font size down until the lines fit.    You then would have to change all of the subsequent font sizes down to make it look consistent. Remember to use spare bar instead of enter and keep hitting space bar until the next sentence falls onto another line.  You could also expand the margins to make the whole line fit.  Another method in Microsoft Word is to force a justify by hitting shift+crtl+J.


A few things to note if you use these templates.
1. To get the justify correct on each line, do not use "enter"/newline/carriage return, just keep hitting space bar until the line drops down.  
2. The very last line has an "x" in white text.  That is there to get the paragraph justify correctly.  If you change the color of the text and select all, remember to change the x back to white.
3. All the dates on the side have an "x" next to them (again in white text).  This is so I could get the underline to go all the way across.  Again, if you change the text color, be sure to change those x's to white or else you're gonna have dates with x's in them.

Hope you guys have fun with this.  I surely did!


Tuesday, January 3, 2012

Triple Duty Apothecary Jar

I totally forgot to post this up.  I know it is after the holidays but I figured I mine as well post up these  pictures, just in case you are shopping and happen to find an apothecary jar drink dispenser on sale or something.     I wrote in a previous post on how I use it as a drink dispenser and to display my collection of wine corks.  This Christmas I found another nifty use for it.  I was able to remove the dispenser spout and string Christmas lights into the bottom dispenser hole.   This makes the apothecary drink jar triple duty.  The lights you use should not have connections outlets on both ends (for stringing them together) or else the cord will not fit through the hole.  I purchased my lights at Walmart; they are single stranded with a plug only on one side.  I want to find another one of these jars, but are sold out at World Market.  I'll have to check again to see if they restocked.  For Valentines day, I may do a lighted Valentine's day display by replacing the ornaments with candy hearts or heart shaped cookie cutters.  I love this jar because without the dispenser hole, the lights would have to come up over the top, making the lid impossible to close.  One tip I have is to hide the spout inside the jar, so when its time to use it as a drink dispenser you know exactly where you put it.


Saturday, December 31, 2011

New Year's Count Down Cups


This post is a little late.  But this was a last minute quick idea for count down cups with foamies.  Simply take numbered foamies or felties and stick them on your campaign glasses.  This will also work as cup markers so your guest can identify their cups.  I did two sets, one with white foamies and the other I glue-sticked the surface dipped in purple glitter.  The foamies come out pretty cleanly from the glass cups also.

Thursday, December 22, 2011

Easy Gift Wrapping and Salf Dough Gift Tags

When I did my salt dough gift tag tutorial I didn't post any pictures of how I used the salt dough gift tags. That's because this year I fell so behind in all of my Christmas shopping. I have been trying desperately to catch up and get all my holiday shopping complete.  I did manage to get a little more than half of my shopping done, so I'll show you some ideas on how to integrate the salt dough gift tags into your wrapping.  I'll also show you how to create some custom stamped wrapping paper of your own.

This rope that goes around the box is actually the handle from a shopping bag.  The paper is a brown paper bag.

I created a custom little pattern with some stamps and an ink pad.  I just love the look of brown paper bags as wrapping paper.

Left over yarn cheaper than ribbon.  I tape the ends so I can string it through.


Here are some of my wrapped gifts.  As you can see, I'm still quite behind and it's almost Christmas.
Salt dough recipe and tutorial here.

Wednesday, December 21, 2011

Custom Monogram Snowflake Tutorial

Here's a twist on the classic paper snowflake. Cut out your monogram on top.  I made a J for my husband and an A for my daughter.  This is a simple craft for a child old enough to use scissors.  If they aren't nimble enough to cut the letters, they can help cut the shapes for the center part of the snowflake.

1. Fold square paper in half
2. Fold in half again, then unfold
3. Take the left corner and fold 30 degrees, then fold the right corner 30 degrees from center (you could use a protractor, but I just eyeballed it
4. Fold in half one more time and cut across the top
5. Unfold and draw on the monogram letter
6. Cut the letter out
7. Fold in half again and cut diagonal so the letter is only attached by small section
8. Cut out little shapes for the snowflake
9. Unfold carefully


Monday, December 12, 2011

How to Make a Mini Rosemary Wreath

As you know from my previous posts, I have tons of rosemary in my yard. Rosemary is so easy to grow that even someone like me with a not so green thumb is able to successfully plant it and propagate it.  With all this rosemary that we have I thought it would be cute to make some mini wreaths.


Sew or hot glue on buttons for a unique mini wreath.


Cut rosemary into even lengths.  You want to get the newer growth so it is more flexible.  Loop together and secure ends with wire.

Adorn with ribbon and fake berries.  This fake twig I fell off another wreath I had.  

A blue one I made.

Thursday, December 8, 2011

How to Make Hot Air Balloon Ornament Tutorial

I get inspiration from so many places.  When browsing the Restoration Hardware website I spotted this adorable hot air balloon nursery mobile.  The first thing I thought was I can make this!

I made my hot air balloon ornament, using a plastic Christmas ornament I bought at the 99 Cents Only store.  There were some cute pink ornaments there that would be perfect for a girls mobile.

Here is my version.

I created a template below that you can download and print.  You can resize it to the same proportion as your ornament.  The easiest way to resize it would be to drag it into Microsoft Word and resize.  You could get fancy and do it in photoshop or get even fancier and not use the template at all and find any basket texture and draw out a template for a box.  If you just want to skip the basket making altogether see the alternative at the bottom of post.
Step1.
Materials needed are as follows:
Glue Stick
Scotch Tape
scissors or an exacto knife
2 Pennies or 1 nickel (optional)
2  pieces of string (6 inches long each)
1 loop screw
1 Plastic ball ornament
Template of hot air balloon basket cut out (template is below). When you cut out the template it is easiest to fold over the basket portion and cut them on top of each other.  That way both pieces are exactly the same shape.  You could cut them out separately but the pieces may not align if you don't cut them perfectly.

Step 2
When you cut out the template you can x non patterned side so you know which sides align. Fold the basket like the image above.

Step 3
Remove the top basket and tape a nickel ,two pennies or anything that will weigh down the basket.  This is optional. I did this as an afterthought after I

Step 4
Tape one corner together.

Step 5
Take string and attach tape onto string.

Step 6
Attach string to corner that was taped in step 4

Step 7
Do step 4 - 6 for opposite corner.

Step 8
Repeat with other string on other two corners of basket.  Make sure string is even or else basket will not be level when attached.  Use glue stick on the top part of basket and place top part of basket inside the basket.  This will make the inside and outside of basket have the same pattern and look more finished.

Step 9
Glue the "trim" strip and place around top of basket.

Step 10
Finished basket.

Step 11
Remove the "cap" off the plastic ornament.

Step 12
Place the string in an "X" position on the cap of the ornament (see image)

Step 13
Whoops I mis-numbered my diagram! There is no 13 :)

Step 14
Make sure basket is level.

Step 15
Using this loop screw, screw it into the "bottom" of the ornament (bottom of ornament is now top of hot air balloon).  You may need to predrill a small hole if your ornament is thick.

Step 16
Attach basket onto ornament by placing "cap" back on.


** An alternative if you don't want to make a the basket out of paper is to use a plastic soda bottle cap and paint it brown.  Hot glue the strings to it

*** If you are making this into a mobile, I would hot glue gun the cap of the ornament onto the ball so there is no risk of coming apart and being a choking hazard.  I would also hang it high enough that it cannot be reached or pulled down by the child.

Wednesday, December 7, 2011

Ninja Ornament Tutorial

Here's a quickie.  Painting a ninja is very simple.  Just use use beige acrylic paint to paint an amoeba like shape across the ornament.  Use a sharpie to draw in circles for eyes, leaving parts of the beige to show through for the pupils.  Draw in eyebrows with sharpie.


Monday, December 5, 2011

How to Create Painted Custom Family Faces Ornament


Avery is almost two. I can't believe how fast time flies. We have started a family tradition of buying one ornament each year to that reminds us of her. Last year we bought a baby's first Christmas 2010 ornament. This year I decided to do something special and paint her face on an ornament. It was actually fairly simple, I used her "Wii Mii" character to go by. Inspiration really comes to me from everywhere.

Below are a few simple steps if you want to do this for someone you know, or even for yourself.

First find a round plastic or glass round ball ornament.  The smaller ones actually are easier to work with.  The ornament I used was an old chrome ornament (that has seen better days) about two inches in diameter.

Prime the ornament with paint primer.  I used left over Kilz latex primer from when we painted our house.

After primer is dry, mix white and brown acrylic craft paint together to get the right skin tone.  Paint the front half of the ornament with the skin tone paint.

Draw on hair and facial features (eyes, nose, mouth, eyebrows, ears for boys with short hair) with a pencil.  Again, look up some Wii Mii characters for inspirations on how to shape these things.  Just a couple of tips on where eyes are positioned on a face.  I learned in high school art class that eyes are half way on the face, and ears are at eye level.  The nose is half way from the chin to the eyes and the mouth is half way from the nose to the chin.

So in math terms
eyes: .5 from chin,
ears: .5  from chin,
nose: .25 from chin,
mouth:  .125 from chin.

There are lots of tutorials online on how to draw faces.

Paint hair all the way around and let dry. Then, using a black fine tipped Sharpie, I drew in the eyes, nose and mouth.  If you want blue/green/brown eyes use the appropriate color Sharpie.  You could also do this with a fine tipped paint brush and craft paint, but I think a Sharpie is so much easier to control.  You can dot the eyes with a little white paint for some contrast.

If you want to put a little pink on the cheeks you can water down some acrylic pink and brush on very lightly.

Prime ornament and paint half with skin tone color  (I used acrylic craft paint).

After primed and face painted, paint hair and draw in facial features with a pencil.  I was actually able to erase the pencil marks if I made a mistake.


I made one for my nephew also.  Going to tie it onto his present along with his salt dough gift tag.


I did create two ornaments of my daughter because one broke. That is why in one of the pictures you see her eyes open and the other they are squinting.  So be careful if you use glass ornaments, I have already broken five this week doing various projects.

Thursday, December 1, 2011

How to Weave a Paper Ball Ornament

When I was in Thailand, I would see the local people weave palm leaves into beautiful bowls, fans, balls and other amazing things. I asked my aunt if she knew how to make these things and she gave me a book that was all in Thai. I don't know how to read Thai, I can barely speak it.  Somehow after a week of fumbling around with strips of paper, I managed to decode the pictures and figure it out. Here is my tutorial for you, it is not in Thai, and hopefully it won't take you weeks to make. I did take pictures, but please watch the video. It is much clearer. The first video is how to create a four strand braid, which is the basic premise behind weaving this ball. If you can do a four strand braid, weaving this ball should be simple (with some practice).  The second video is how to use paper to weave the ball.

Newspaper ball on left, Magazine on right.


I used a cookie wrapper to make a silver ball. 


Part 1 (Four strand braid)

Part 2 (Paper weaving)

Pin It button on image hover